
To perform an installation can be done in two ways.
CLEAN INSTALL

A clean install of Windows is the right way to go when all other software troubleshooting you've tried has been unsuccessful and you want to install or reinstall a "clean" copy of Windows back on your computer.
Plan Your Windows 7 Clean Install

Most of the time, a Windows 7 clean install means to remove an existing operating system (like Windows XP, Linux, Windows 7, Windows 10, Windows 8, ... it doesn't matter) and replace it with a fresh or "clean" installation of Windows 7.
In other words, it's the "erase everything and start from scratch" process for Windows 7, a procedure referred to as a "clean install" or sometimes as a "custom install." It's the ultimate "reinstall Windows 7" process.
A clean install is often the best way to solve very serious Windows 7 problems, like a virus infection you can't get rid of completely or maybe some kind of Windows issues that you can't seem to solve with normal troubleshooting.
Performing a clean install of Windows 7 is usually a better idea than upgrading from an older version of Windows as well. Since a clean install is a true start over from scratch, you don't risk inheriting any buggy situations from your previous installation.
Boot From the Windows 7 DVD or USB Device

To begin the Windows 7 clean install process, you'll need to boot from the Windows 7 DVD if you're using a Windows 7 DVD, or boot from a USB device if your Windows 7 installation files are located on a flash drive or other external USB drive.
- Restart your computer with the Windows 7 DVD in your optical drive, or with the properly configured Windows 7 USB flash drive plugged in.
- Watch for a Press any key to boot from CD or DVD... message similar to the one shown in the screenshot above. If you're booting from a flash drive, the message may be phrased differently, like Press any key to boot from external device....
- Press a key to force the computer to boot from the Windows 7 DVD or USB storage device. If you do not press a key, your computer will attempt to boot to the next device in the boot order, which is probably your hard drive. If this happens, chances are your current operating system will boot.

Wait for Windows 7 Setup to Finish Loading

You don't need to do anything at this point either.
Choose Language and Other Preferences

Choose the Language to install, Time and currency format, and Keyboard or input method that you'd like to use in your new Windows 7 installation.
Click Next.
Click the Install Now Button

Click on the Install now button in the center of the screen, under the Windows 7 logo.
This will officially begin the Windows 7 clean install process.
Wait for Windows 7 Setup to Begin

The Windows 7 setup process is now beginning.
No need to press any keys here - everything is automatic.
Accept the Windows 7 License Terms

The next screen that appears is a text-box containing the Windows 7 Software License.
Read through the agreement, check the I accept the license terms checkbox under the agreement text and then click Next to confirm that you agree with the terms
Choose the Type of Windows 7 Installation to Complete

In the Which type of installation do you want? window that appears next, you're offered the choice of Upgrade and Custom (advanced).
Click on the Custom (advanced) button.
Show the Windows 7 Advanced Drive Options
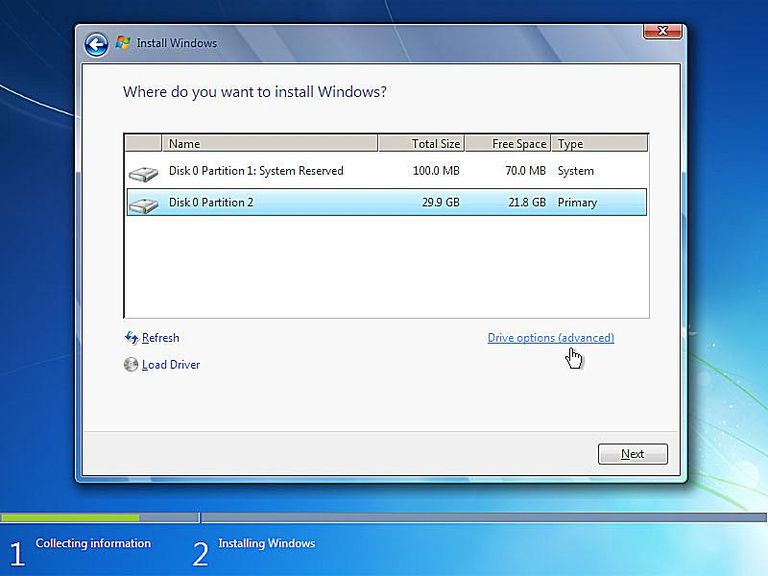
In this screen, you'll see each partition that Windows 7 recognizes. Since a clean install involves the removal of all operating system related partitions, if they exist, we'll do this now.
Windows 7 setup considers partition management as an advanced task so you'll need to click the Drive options (advanced) link to make those options available.
In the next few steps you'll delete the partitions containing the operating system you're replacing with Windows 7, be it Windows Vista, Windows XP, a previous installation of Windows 7, etc.
Delete the Partition Windows is Installed On

rg